3.0. Overview
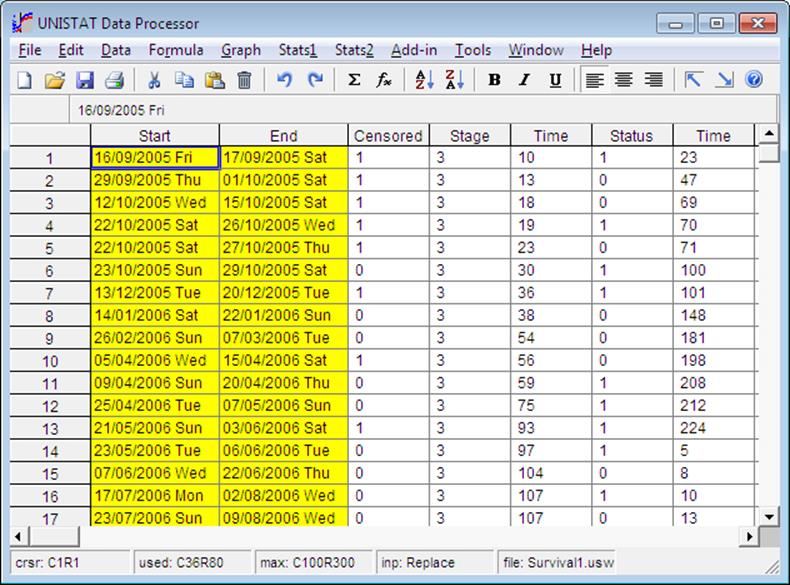
The Data Processor is a column-based alphanumeric spreadsheet, which is used for entering and handling data.
3.0.1. Screen Layout
The top line of the screen displays the pull-down menu bar. The next line is the Data Processor toolbar which contains a number of buttons. The Input Panel is situated under the toolbar.
3.0.1.1. Toolbar
![]()
The toolbar provides direct access to commonly used Data Processor functions. You can toggle the display of toolbar on and off from Tools → Toolbar.
![]() New: Clears the data in spreadsheet.
If data has been changed you will be prompted whether you wish to save the
existing data first.
New: Clears the data in spreadsheet.
If data has been changed you will be prompted whether you wish to save the
existing data first.
![]() Open: Activates the file open dialogue
(see 3.1.2. Open).
Open: Activates the file open dialogue
(see 3.1.2. Open).
![]() Save: Updates the file on disk with
the version in spreadsheet. No dialogues will pop up. If the data has been
entered from the keyboard or pasted, and therefore there does not exist a file
name, a file name will be asked first.
Save: Updates the file on disk with
the version in spreadsheet. No dialogues will pop up. If the data has been
entered from the keyboard or pasted, and therefore there does not exist a file
name, a file name will be asked first.
![]() Print: Activates the Print dialogue.
Print: Activates the Print dialogue.
![]() Cut: Copies the highlighted range to
the clipboard and then erases it. If there is data in lower rows then the
erased range is filled with missing values.
Cut: Copies the highlighted range to
the clipboard and then erases it. If there is data in lower rows then the
erased range is filled with missing values.
![]() Copy: Copies the highlighted range to
the clipboard.
Copy: Copies the highlighted range to
the clipboard.
![]() Paste: Copies the contents of the
clipboard to the spreadsheet. The top left corner of the incoming block is placed
at the active cell (see 3.2.5. Paste).
Paste: Copies the contents of the
clipboard to the spreadsheet. The top left corner of the incoming block is placed
at the active cell (see 3.2.5. Paste).
![]() Clear: The highlighted block is
cleared. If there is data in lower rows then the erased range is filled with
missing values.
Clear: The highlighted block is
cleared. If there is data in lower rows then the erased range is filled with
missing values.
![]() Undo: Restores the state of the
spreadsheet before the last edit.
Undo: Restores the state of the
spreadsheet before the last edit.
![]() Repeat: Repeats the last editing
action.
Repeat: Repeats the last editing
action.
![]() Range Statistics: Data Processor’s Range Statistics procedure is activated.
Range Statistics: Data Processor’s Range Statistics procedure is activated.
![]() Formula Editor: Activates the Formula Editor dialogue.
Formula Editor: Activates the Formula Editor dialogue.
![]() Sort Ascending: Sorts the current
column (i.e. where the active cell is) in ascending order.
Sort Ascending: Sorts the current
column (i.e. where the active cell is) in ascending order.
![]() Sort Descending: Sorts the current
column (i.e. where the active cell is) in descending order.
Sort Descending: Sorts the current
column (i.e. where the active cell is) in descending order.
![]() Column Font Style Group: Bold, Italic,
Underline: The text in selected columns will be displayed bold, italic or
underlined, or in any combination of the three styles. These selections are
saved as part of .USW files.
Column Font Style Group: Bold, Italic,
Underline: The text in selected columns will be displayed bold, italic or
underlined, or in any combination of the three styles. These selections are
saved as part of .USW files.
![]() Column Alignment Group: Align Left,
Centre, Align Right: These three buttons will left-justify, centre or
right-justify the text in highlighted range of columns. The default format is
left-justify. This information is saved as part of .USW files.
Column Alignment Group: Align Left,
Centre, Align Right: These three buttons will left-justify, centre or
right-justify the text in highlighted range of columns. The default format is
left-justify. This information is saved as part of .USW files.
![]() Home: Simulates pressing <Ctrl>
+ <Home>. The active cell will be located at (1, 1).
Home: Simulates pressing <Ctrl>
+ <Home>. The active cell will be located at (1, 1).
![]() End: Simulates pressing <Ctrl> +
<End>. The active cell will be located at the last column and the last
row containing data.
End: Simulates pressing <Ctrl> +
<End>. The active cell will be located at the last column and the last
row containing data.
![]() Help: Activates the UNISTAT help
system.
Help: Activates the UNISTAT help
system.
3.0.1.2. Input Panel
![]()
The line below the toolbar is used to display the contents of the active cell, and to input various parameters or formulas. When the spreadsheet is in ready mode, contents of the active cell are displayed on the left of the panel. This can be a number, string expression, date, time, a missing value marker (*) or a formula, depending on the type of the column (see 3.0.2. Data Types).
![]()
After a procedure is performed, some other buttons are added to the Input Panel. The button with a curly arrow on the left is used to activate the Last Procedure Dialogue for the current procedure (the name of which is displayed on the left). The next six icons are used to send the output from this procedure to another Output Medium (see 2.2.0. Output Medium Toolbar). The available options are:
1) Data Processor
2) Output Window
3) Word (if installed)
4) Excel (if installed)
5) Default web browser (if installed)
6) Windows clipboard
If they have been created by the user before, Macro Shortcut Buttons (displaying numbers 1 and 2) will be placed at to the right of the Windows clipboard button.
![]()
![]()
The Input Panel is also used for various prompts and inputs. When the user is prompted for input, for instance, the panel will look slightly different. The two buttons that appear on the left have the following tasks.
![]() Check: OK Simulates pressing
<Enter>.
Check: OK Simulates pressing
<Enter>.
![]() Cross: Cancel. Simulates pressing
<Esc>.
Cross: Cancel. Simulates pressing
<Esc>.
3.0.1.3. Status Panel
The bottom line is called the Status Panel and displays information about the Data Processor parameters:
![]()
Crsr: The two numbers displayed are the coordinates of the active cell in the data matrix; first the column number and then the row number.
Used: This gives the largest column number containing data or formula, followed by the largest row number in use.
Max: Current dimensions of the data matrix, i.e. the largest number of columns and rows that can be used. These dimensions can be reset from Tools → Options → Memory Management.
Inp: This refers to the current input mode. It can be either Replace or Append which is set from Tools → Options → Spreadsheet.
File: This shows the name of the data file that is currently in Data Processor.
3.0.2. Data Types
It is possible to enter numeric, string, date or time data and missing values. Numeric data can be integers or double precision floating point numbers, including exponential numbers. String Data can be any string expression with practically no restrictions on the number of characters in each cell. Dates can be entered in any international format and the program automatically works out the day of the week.
Columns containing numeric, string and date / time data (as well as function columns) can be displayed in different colours (see 2.4.1.8. Colours).
To input data from keyboard into a cell, position the active cell on the cell and type in the data. The keystrokes are typed into the cell directly.
To enter a column or row label, double-click on the label. A text editor will be placed on the Input Panel. Enter or edit the label, and then click <Enter/OK>.
Data already entered into a cell can be edited if the Cell Edit mode is set to Append (see 2.4.1.7.4. Cell Editing). In this way, numeric, string, date or time data can be edited without having to retype the whole expression.
Click anywhere outside the cell or press <Enter/OK> and the newly typed data will become a part of the spreadsheet. The cell may not display the data in the form in which it was typed-in. For instance, when you enter a date, the program will instantly interpret this and print the day of the week alongside it (see 2.4.1.5.3. Date Format). When you enter positive numbers, they are displayed with a leading space.
If <Escape/Cancel> is pressed input (or editing) will be terminated and the previous content of the cell will be restored.
3.0.2.1. Numeric Data
It is possible to enter numbers in any format, including decimal, integer and exponential formats. However, expressions including mathematical operations cannot be entered. For this purpose use the Formula → Calculate procedure. If the number entered is too small or too large, then it will be displayed in exponential format.
The number typed in may be a double precision number with up to fifteen digits. Although any floating point numbers or integers between -1E+300 and 1E+300 can be entered, the user should be careful to process data within -1E+30 and 1E+30 range in order to prevent some unexpected number overflow problems.
In some cases (e.g. exponential numbers) fewer digits may be displayed in a cell than are internally stored, owing to the format of the display.
3.0.2.2. String Data
In order to input string (or character) data, bring the active cell to the desired position and type the expression. If the first letter typed is not a number (a floating point, or a plus or a minus sign), then the program will assume that the cell will contain String Data. If this cell is the first one typed into a blank column, it will define the column’s type as a string column. If the string typed contains less than eight characters (including spaces) then the column will be defined as a short string column (see 3.0.2.2.1. Short Strings). If it has more than eight characters then the column will be defined as a long string column (see 3.0.2.2.2. Long Strings). If the type of column was already defined as one of number, date or time, then its type definition will be changed to string, and all existing cells in the column will be converted into their equivalent string representations. These conversions do not always produce meaningful results. (see 3.4.2.6.1. Data Conversion Functions).
Because Data Processor is a column based spreadsheet, once String Data is entered in a cell, the entire column will be assumed to contain String Data. A column can contain only one of numeric, short string, long string, date or time data, but not a mixture.
To tell Data processor that you wish to enter a formula rather than string data, press <=> first when Data Processor is in Ready mode. This is equivalent to selecting Formula → Quick Formula from the menu bar.
It is also possible to define a column as a String Data column by entering a special spreadsheet function. To do this move the active cell to the desired column and select Formula → Quick Formula (or simply press <=>), as if entering a formula (see 3.4. Formula). Then, to define the column as a short string column type either String or Character and press <Enter/OK> (see 3.4.2.6.1. Data Conversion Functions). It is sufficient to enter the first four characters Stri or Char. To define the column as a long string column enter the function Long(n), where n is an integer linking the current spreadsheet column with the nth column in the Long String Table. A string column can be redefined as a numeric column by entering either Number or Data. Again, the first four characters will be sufficient.
The String Data is case-sensitive; i.e., lower case letters are distinguished from upper case letters. In Variable Selection Dialogues, string variables are distinguished from numeric variables in that the letter C in their column references is replaced by the character S for short strings and L for long strings. The colour of String Data columns can be changed from Tools → Options → Colours.
3.0.2.2.1. Short Strings
If no cells in a String Data column contain more than eight characters, then this data type should be preferred to long strings. Use of a short string variable (instead of a long string variable) has the following advantages:
1) Faster execution speed
2) Smaller data file size
3) Reduced memory usage
4) No need to keep track of correspondence with a string table.
Once a column is defined as a short string column, subsequent entries into this column will be truncated to eight characters, if they are longer. In case you have to convert a short string column into a long one, you can use the Data Processor’s Long function (see 3.4.2.6.1. Data Conversion Functions).This will create a Long String Table entry for the existing strings and convert the type of the column to long. Subsequent long string entries can be made manually.
3.0.2.2.2. Long Strings
This data type is inherently different from other data types. While the information for all other data types (including short strings) are held in 8-byte data cells, the long strings are stored in a separate Long String Table. The long data string cells only contain integers referring to entries in this table. The program constantly maintains and updates this correspondence and displays the long strings, instead of the underlying integers, in all parts of the user interface, as well as in output. Therefore, under normal circumstances, you do not need to worry about all this, and may consider long strings as a data type just like others.
On the other hand, the advanced user is provided with means of maintaining absolute control over long strings. The Edit → Long String Table dialogue allows you to edit, enter and rearrange long strings manually.
The main advantage of this approach is to prevent unnecessary loss of memory and storage space by storing all occurrences of repeating sequences of String Data. In an overwhelming majority of cases in statistical analysis, the use of String Data is confined to categorical (factor) variables, where each distinct String Data point (level) is likely to be repeated many times in the same column.
You can convert a long string column into a short one using the Data Processor’s Short function (see 3.4.2.6.1. Data Conversion Functions). This will truncate all entries longer than 8 characters, and you may thus loose vital variability in data. The Long String Table entry for the existing strings will not be deleted.
3.0.2.3. Date Data
Dates can be entered in any international format. When a date is entered, UNISTAT automatically works out the day of the week and, optionally, displays it alongside the date (see 2.4.1.5.3. Date Format). It is possible to subtract two columns containing dates to obtain the number of days between the date pairs.
In order to enter a date into the Data Processor the user needs to know the Windows international date format setting and the date separator character. This information should have been automatically configured during the setup of your Windows system. If you are not sure what these settings are, you can have a look at the Tools → Options → Data Export / Import 2 dialogue’s Date Format frame. The following are some typical date formats:
|
UK: |
day/month/year |
|
Germany: |
day.month.year |
|
US: |
month/day/year |
When a string of characters typed into a cell contains the date separator character twice, then the cell will be considered as a date cell. Because the Data Processor is a column based spreadsheet, once Date Data is entered in a cell, then the entire column will be assumed to contain Date Data.
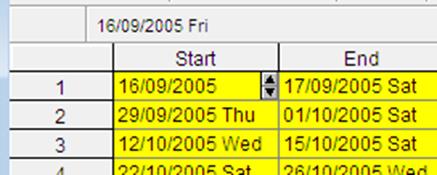
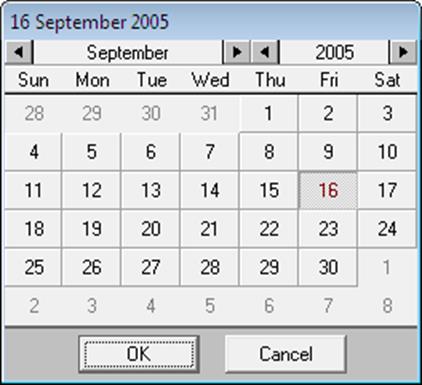
Double-clicking on a date cell will put the cell in edit mode. Once in edit mode, dates can be incremented or decremented by two scroll buttons. If the small triangle pointer is under the month then the month will increment / decrement when the scroll buttons are clicked. Double-clicking on a date cell in edit mode will invoke a calendar with the current date highlighted. Any date can be selected by clicking on the calendar. Clicking <OK>, control will return to edit mode with the highlighted date entered into the cell.
In Variable Selection Dialogue, date variables are distinguished from numeric variables in that the letter C in their column reference is replaced by D.
It is possible to fill in a column with dates automatically using the DAYS function (see 3.4.2.6.2. Date and Time Functions), which has options for the number of days to increment, 5-day working week, etc. The colour of the Date Data columns can be changed from Tools → Options → Colours.
3.0.2.4. Time Data
Time Data is entered using the colon character (:) as the separator. If only one colon is used then it is assumed to separate hours and minutes. If two are used, then they are assumed to separate hours, minutes and seconds. If three colon characters are used, then they are assumed to separate days, hours, minutes and seconds. For instance:
1:15 01:15:00
1:15:17 01:15:17
1:1:15:17 1:01:15:17
In Variable Selection Dialogues, time variables are distinguished from numeric variables in that the letter C in their column reference is replaced by T.
A column can be filled in with Time Data automatically using one of Secs(), Mins() or Hour() functions (see 3.4.2.6.2. Date and Time Functions). The colour of the Time Data columns can be changed from Tools → Options → Colours.
3.0.2.5. Date-Time Data
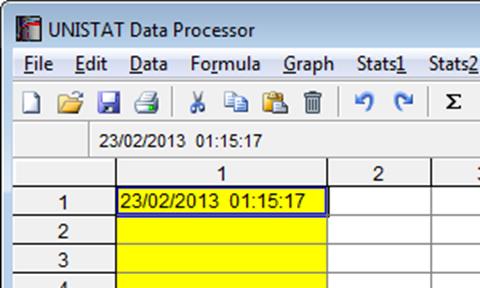
In addition to Date Data and Time Data, UNISTAT also supports the Date-Time Data type:
23/02/2013 01:15:17
23.02.2013 19:53:35
02/23/2013 23:19:03
The date and time parts are as described above and they are separated by a space. UNISTAT does not provide a separate date-time data type command, but automatically recognises such data and stores it as Date Data.
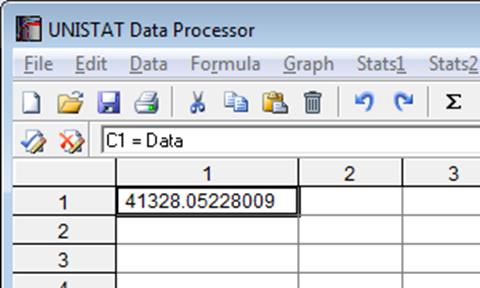
Internally, all date and time data are stored as floating point numbers. The integer part represents the day and the decimal part the time. For instance, if you enter the following data into Data Processor:
23/02/2013 01:15:17
it will recognise this column as a Date column and by default, mark it with a yellow background.
If you press the equal key and enter Data, the format of the column will change to numeric and the floating point equivalent of this particular date will be displayed.
To display the same column as a date column, enter:
= Date
To strip the time component from a Date-Time Data column, display the numeric values and enter:
= Int(c1)
and re-define the column as Date. Similarly, you can enter the following function to strip the date component, and re-define the column as Time:
= c1-Int(c1)
3.0.2.6. Missing Data
Any blank cells in a column, below which there are cells containing data, will be considered missing. For more information see 2.4.1.1.4. Missing Data Code.